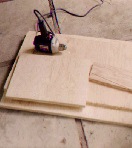
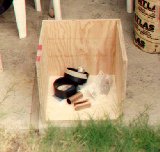
 Here's where it all started, with a pile of plywood, a lot of courage, and some plans I modified to suit my needs. Although the plans called for 3/4" plywood, I thought that 1/2" would save weight, and nearly used it. I'm glad we didn't try that, as the stresses would have been too great for 1/2"! Birch was used, as it was supposedly lighter.
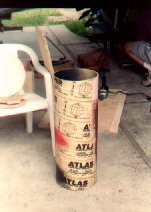
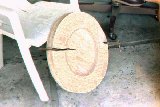
 At right is the material we used for the tube: it's good old cheap, round concrete forming tube. (This has come to be almost universally referred to as "Sonotube" ® (a Sonoco product), but is also generically made by other companies, sold under various brand names, and is available at your local builder's supply. Use what is at hand.) It had to be throughly scraped with #00 steel wool before we started painting it. Some advise total de-waxing with solvent, if necessary, but I felt that would have been discarding a valuable property of the tube: water resistance! As it turned out, I was able to get a type of acrylic garage floor paint (Ace hardware) that adheres to darn near anything! (It's been 12 years, now, and it's still adhering.) In order to find a paint that would stick to the waxy surface, I tested out quite a few, hence the various red and black blotches!
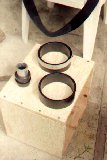
This is the tube box. Until I had to try and make one, I really didn't realize how hard it is to make a box that's perfectly squared-off. The two black round thingies on top are actually a PVC coupling sawed in half, (the future tube box bearings) and the steel tube/plumbing assembly is a recycled Coulter focuser. Our main concern with the PVC coupler/bearings were thier small diameter; Some recommend 6", and these are only 4.5"; as it later turned out, the smaller size (greater pressure) led to some scoring of the PVC by the harder Teflon, and we had to encase the PVC with aluminum flashing (not shown).
OK, now we have the rocker box partly assembled. It was mainly a lot of driving in screws and sanding! No matter how carefully you measure, the darn thing always seems to have a little bit of overlap that has to be sanded down. As discussed in the previous paragraph, the PVC bearings later had to be encased in aluminum flashing (not shown) to prevent scoring of the PVC by the harder Teflon. Perhaps they should have been made of machined aluminum or some such metal, but we didn't have a machine shop handy. Oh, well!

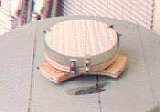
This is the main bearing (a formica sink-top cut-out from a cabinet shop) being attached to the bottom of the rocker box. (Note: Most cabinet-making shops that do kitchen remodels will give the cut-out away for free, or very little money indeed.) The screws were countersunk so there would be no interference with the three teflon bearing pads on the mating surface, which is, of course, the base (next picture).
 This is the beginning of the base; three layers (two with the center cut out) have been glued together and clamped. Again, it's hard doing this with a jigsaw, and getting everything perfectly round! Once the whole thing was secure, I used a "Sureform" tool to round off the high spots; this took more time and effort than one would like, but it's worth it. I knew this telescope was going to look home-brewed, but there's no reason for poor workmanship! If I had to do it again, though I'd have used the belt sander that was offered. My Scots-Irish pride wanted to do as much of this project as I could myself, though, and so I ended up using the SureForm and lots of elbow grease!
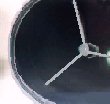 Now it was time to start on the tube. This shows our first spider, a homeade job, inside the tube. The interior of the tube was painted with "Flat Black Barbecue" spraypaint; I worked from the inside to the ends. It was a bit tricky, and I ended up with black paint-fogged arms. Lesson: wear long gloves! The result, however, was perfect. Light just fell into that flat black surface. The spider was made from thin wood slats and a section of 1-1/4" dowell sawed at a precise 45 degree angle. Use a mitre box if you can...I did it by eyeballing it with a hack saw. The mirror was then directly glued on to the spider with black RTV (silicone rubber cement). It was strictly a "friction fit" inside the tube, but a good one. Still, it caused me some nervousness; lying in bed at night I waited for the "CRASH!" of the secondary plummeting into the primary, so I ordered a Novak assembly and got some sleep!
 Finally, it was "cell time". The one you see here is made entirely of wood and steel fittings. The design you see here is from an obscure source, and there are no drawings. Someday I'll get some done and put them here.
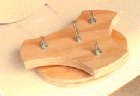
 Here's the mirror (Orion Optical-the Pyrex Standard Coating model) in the cell. The mirror sits in the cell retained by six metal brackets, keeping the mirror firmly centered and stable. A detailed shot of the cell can be seen by clicking here. It must be noted that this cell has been fairly easy to collimate, and, once collimated, has stayed there since the original calibration was done. The 'scope has been over hill and dale, to observing nights for the public in the city, all kinds of backwoods Star Parties, across railroad tracks, and overland many thousands of miles (I stopped counting at 20,000), and the alignment of the mirrors has hardly changed a whit. I attribute this to the very solid cell design, and the excellent spider by Novak (R.I.P.) we ended up with.
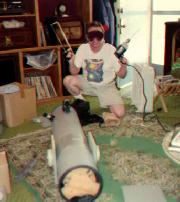 "The Big Push". Once all the pieces have been fabricated, all the mail-order parts delivered, and the tube balanced and painted, it's time to put the whole thing together! The author, in welding goggles, drill, and hacksaw, is shown here brandishing his tools of trade amid the remains of his living room, clearly indicating that he means business. His Faithful Native Companion (wife) is offscreen calling 911.
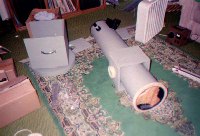 Nearly done! The external plywood tube ring ring at the base was discarded in favor of some heavy-duty rubber window channeling (see base in previous photo) gleaned for free from a local glazier. I thought that the tube rings, while they would have improved the structural integrity of the tube, might make getting the thing in and out of my Mazda trunk a real pain. As it worked out, the channeling works super; the tube is quite strong enough without the plywood tube rings. "Free," you say? Yep. I just marched into the place, said, "Hey, guys, I'm an Amateur Astronomer, and I need some channeling for a 'scope I'm building! Got any?" The two guys running the place looked at each other, shrugged and gave me some! I guess it was easier than holding me down until help arrived......
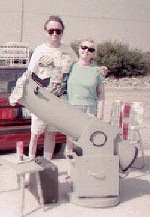
And guess what? It was done! And the darned thing worked so well we were (and still are) delighted! In the photo below, Cheryl, my wife, (who has her own Lunar page) appears quite happy that the project is done, and all that lumber is out of the living room!

Excellent books for Beginners:
 "The Backyard Asttronomer's Guide"
"Turn Left at Orion"
Other Fine Related Books
These are very well recommended:
"Build Your Own Telescope"
"Nightwatch: A Practical Guide to Viewing the Universe"
"Deep Sky Companions : The Messier Objects"